
Created/Updated timestamps in LDM
There are several cases where you may need to display the data updated time to the dashboard users. One suggested solution is to add an attribute in the Logical Data Model (LDM) to store the updated time and reflect it in the dashboard. In this article, I will explain how to create or update timestamps in the LDM to show the updated date time on a dashboard in GoodData.CN (This functionality is also available in the GoodData Platform, the direction in the bottom section of this article).
There are 2 major reasons why you may want to add an attribute in LDM that reflects the data updated time. First, a technical reason is data versioning. Data Engineers may create versions of data to roll back the data to the earlier version if any mistake is made. Another reason is simply to show the users when the data is last updated.
Let’s pretend you are designing a dashboard for a Portfolio manager who oversees the net worth of mutual funds in the portfolio. Net Asset Value (NAV) is the metric to calculate the net worth of a mutual fund. However, NAV does not update until 3 hours after the stock market closes; it means the NAV you see during trading hours is not the most updated number, and you need to show the users when the data is updated on the dashboard. In order to display the “date updated” on the dashboard, you can add the “date updated” attribute like the following LDM:

Diagram 1: LDM of Portfolio workspace (GoodData.CN)
When you are using GoodData.CN, the best way to create this LDM is to first prepare those tables with data in your local Postgres database and scan the database in your GoodData.CN workspace. You should save the updated date in varchar in your database so that GoodData.CN will be able to convert that column data type to string. Note that the “Date Updated” should be set as an attribute in the LDM instead of a date attribute because the date attribute in LDM is designed to segment the data set, and it is not possible to be shown by itself in the analytical designer unless it is a string attribute.
In this LDM, you may notice that the “Date Updated” table is disconnected from the “Fund Price” table. This is so the “Date Updated” column can’t be segmented by any column in the “Fund Price” table or “Price Date” table.
If you are interested in learning more about how to add the created/updated timestamps in the GoodData Platform, you may head to the bottom of this article for the directions.
Once the LDM is prepared in your GoodData.CN or GoodData Platform workspace, you may head to Analytical Designer to create your line chart showing the NAV of funds and a textbox listing the latest updated date. To create the textbox of the latest updated date, first select the “Table” visualization in the Analytical Designer in Diagram 2 and drag “Date Updated” to rows.

Diagram 2: Build a Box to Show the Latest Updated Date
After that, you will have created your new insight:

Diagram 3: An Insight about the Latest Updated Date
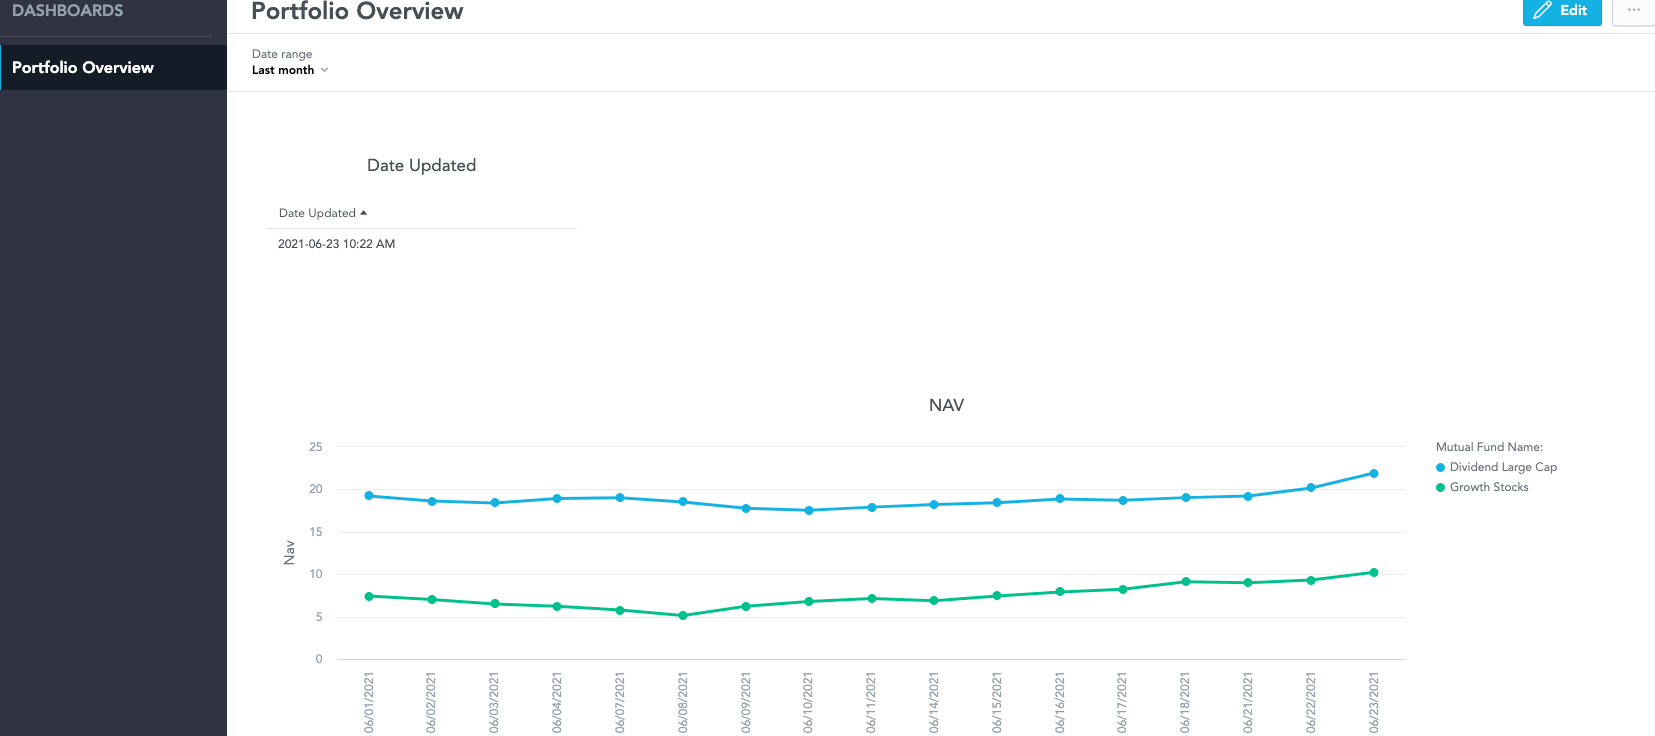
Finally, when we have insights of both the NAVs and the latest updated date, we can put those insights into a dashboard like Diagram 4:

Diagram 4: Dashboard of Portfolio Overview (GoodData.CN)
Diagram 4 is a simple example to display the latest date updated along with other core insights in a dashboard. If a portfolio manager looks at this dashboard at 10 AM on June 23, 2021, the portfolio manager can realize the graph is generated from data obtained from yesterday. Since the “Date Updated” table is disconnected from the “Fund Price” table in the LDM, we can change the date range limited to last week to show the NAV charts for price in last week while having the “Date Updated” table unchanged like Diagram 5:

Diagram 5: Dashboard of Portfolio Overview showing Last 7 days only
The NAV chart has been filtered to the date range to last 7 days, but Date Updated has not been changing as we expected.
The Date Updated column should only contain 1 entry in your data source. Every time you add more entries to the “Fund Price” table in the Postgre database, you should delete the old Date Updated entry and replace it with the updated date as a new entry in that Date Updated column. Then, send the following API call to have GoodData.CN to sync with your data source:
| curl $ENDPOINT/api/actions/dataSources/<Data source id>/uploadNotification -X POST \ |
For example, if I have added new NAVs for the trading day on June 21, 2021, and change the Date Updated entry, after refreshing the data, the dashboards will update like in Diagram 6:

Diagram 6: Dashboards Updated after June 23, 2021
Notifying users of the last updated date on the dashboard may include creating a disconnected attribute in the LDM in GoodData.CN allows you to achieve it. This functionality can be used in other settings, but you may use the same framework to achieve the goals.
GoodData.CN is a cloud native analytics service for your analytical needs that you can deploy locally.
If you are interested in GoodData.CN, please contact us.
How to Do This in GoodData Platform (Optional)
Creating/Updating timestamps in the GoodData Platform is very similar. First, you need to create the same LDM like Diagram 7 and output stage in the GoodData Platform.

Diagram 7: LDM of Portfolio workspace (GoodData Platform)
After the LDM is published and the output stage is created, set up the CSV downloader brick, ADS integrator brick, and SQL Executor brick in the Data Integration Console (DISC) to ingest data to Automated Data Distribution (ADD). Then, set up an ADD brick to trigger the data load in ADD to distribute the data to the workspace. After that, design the insight using an analytical designer and the dashboard like you did in GoodData.CN and you may get a dashboard like GoodData.CN in Diagram 8:

Diagram 8: Dashboard of Portfolio Overview (GoodData Platform)
On the next trading day, you may add new observations to the “Fund Price” table in ADD and replace the entry in the “Date Updated” table with the updated date and time in string (Remember to delete the old entry in this table). Go back to the Data Integration Console (DISC) and trigger the ADD load in the workspace. The dashboard will be updated automatically, like in Diagram 9.

Diagram 9: Dashboard after ADD Load with New Entries
If you are interested in GoodData.CN, please contact us.
Alternatively, test a trial version of GoodData Cloud: