
This article is a follow-up to the article Okta SSO Integration Guide with GoodData.CN. We will show you how to embed GoodData.CN Dashboard to custom React.js application with a silent login via SSO. In the first article, we ended up with the OpenID Connect (OIDC) configuration. OIDC is an OIDF standard that profiles and extends OAuth 2.0 to add an Identity Layer — creating a single framework to provide secured access to APIs, mobile native applications, and browser applications in a single, cohesive architecture.
Before we dive into the problem, let me just say that I am running GoodData.CN and React.js application on my computer — therefore, all API requests are to localhost.
Step 1: Map Okta user-to-user in GoodData.CN
Let’s map the Okta user to GoodData.CN with two simple API calls.
- The first one updates the OIDC settings of the organization:
$ curl --request PUT \
  --header "Authorization: Bearer $GDC_API_TOKEN" \
  --header 'Content-Type: application/vnd.gooddata.api+json' \
  --data '{
  "data": {
    "id": "default",
    "type": "organization",
    "attributes": {
      "name": "GoodData.CN - Auth Test",
      "hostname": "localhost",
      "oauthIssuerLocation": "https://<your-issuer-url>",
      "oauthClientId": "<your-client-id>",
      "oauthClientSecret": "<your-client-secret>"
    }
  }
}' http://localhost:3000/api/entities/admin/organizations/default
-
The second API call maps a user in the Identity Provider to the organization:
$ curl --request POST \
  --header "Authorization: Bearer $GDC_API_TOKEN" \
  --header 'Content-Type: application/vnd.gooddata.api+json' \
  --data '{
      "data": {
        "id": "john.doe",
        "type": "user",
        "attributes": {
          "authenticationId": "<user-sub-claim>"
        },
        "relationships": {
          "userGroups": {
            "data": [ {
              "id": "adminGroup",
              "type": "userGroup"
            } ]
          }
        }
      }
}'  http://localhost:3000/api/entities/users
As mentioned, you can see that both API calls are against localhost. Suppose you do not run your GoodData.CN on your computer — just use your domain instead. You can verify that everything is set up successfully by visiting localhost or your domain where GoodData.CN is running — you should see Okta login. You can also find more information here: GoodData.CN external OIDC.
Step 2: React application with all necessary dependencies
If you already have an application where you are using okta as your Identity Provider, feel free to skip this section.
- Create react application:
$ npx create-react-app gooddata-client - Add all necessary dependencies:
$ npm install @okta/okta-react @okta/okta-auth-js react-router-dom@5
Now everything is ready. The application has all necessary dependencies, and we can run npm start to start the application. We are running GoodData.CN on port 3000 — due to this fact, we will need to run the react application on port 3001. After running command npm start, the process will ask you if you want to start the react application on port 3001.
Step 3: Configuration of the react application in the Okta admin console
If you already have an application where you are using okta as your Identity Provider, feel free to skip this section.
- In the Okta admin console, navigate to Applications.
- Click on the Create App Integration button.
- Select OIDC - OpenID Connect in the Create a new app integration section.
- Select Single-Page Application in the Application type section.
- Name your application, for example, GoodData.CN - Client:
- Add Sign-in redirect URI and Sign-out redirect URI, in our case (since we are running everything locally) localhost:
- Select assignment (for example, allow everyone in your organization to access) and save the configuration.


Step 4: Connect everything together
- Edit App component (./src/App.js):
import './App.css';
import { BrowserRouter as Router, Route, Switch } from "react-router-dom";
import { OktaAuth } from "@okta/okta-auth-js";
import { Security, SecureRoute, LoginCallback } from "@okta/okta-react";
import Home from "./Home";

const config = {
   clientId: "<your-client-id>",
   issuer: "https://<your-okta-domain>.okta.com/oauth2/default",
   redirectUri: "http://localhost:3001/login/callback",
   scopes: ["openid", "profile", "email"],
   pkce: true,
};
const auth = new OktaAuth(config);

function App() {
   const restoreOriginalUri = (oktaAuth, originalUri) => {
       window.location.replace(originalUri || "/");
   };

   return (
       <div className="App">
           <Router>
               <Security oktaAuth={auth} restoreOriginalUri={restoreOriginalUri}>
                   <Switch>
                       <Route path="/login/callback" component={LoginCallback}/>
                       <SecureRoute path="/" component={Home}/>
                   </Switch>
               </Security>
           </Router>
       </div>
   );
}

export default App;
Let’s just briefly explain the essential parts of the code. The react application redirects the browser to an Okta-hosted sign-in page to sign users in, and Okta then redirects back to your application with information about the user. The first thing that you need to define is how Okta calls your app after a user is authenticated. The user does not see the callback route, and it is not the user's final destination. It is just one step in the authentication redirect flow. Therefore, we are using /login/callback route. Also, you can notice that there is the configuration of the Okta provider. You can find all the necessary information (clientId and issuer) in the Okta admin console.
- Add new component Home (./src/Home.js):
You can now visit localhost:3001, and you should be redirected to the Okta login page (if you are not already logged in).import { useOktaAuth } from "@okta/okta-react";
function App() {
const {oktaAuth} = useOktaAuth();
const logout = () => oktaAuth.signOut();
return (
<div>
<h1>Welcome!</h1>
<button onClick={logout}>Logout</button>
</div>
);
}
export default App; - Open the dashboard you want to embed, and in the right upper corner, click on the Embed button:
- Click the Copy Iframe button:
- Edit the Home component (./src/Home.js):
import { useOktaAuth } from "@okta/okta-react";

function App() {
   const {oktaAuth} = useOktaAuth();
   const logout = () => oktaAuth.signOut();

   return (
       <div>
           <h1>Welcome!</h1>
           <button onClick={logout}>Logout</button>

           <iframe
               src="http://localhost:3000/dashboards/embedded/#/workspace/<your-workspace-id>/dashboard/<your-dashboard-id>?showNavigation=true&setHeight=700"
               height="700px"
               width="100%"
               frameBorder="0">
           </iframe>
       </div>
   );
}

export default App;


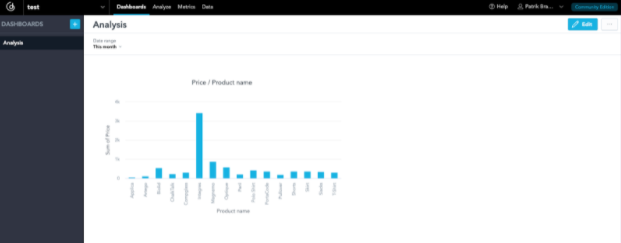
Perfect, your application should now look like this (of course with your dashboard):
You can try logout/login, and everything should be smooth. You just need to log in once to your react application.
Troubleshooting
- I you block 3rd party cookies in your browser and the domain of GoodData.CN is different from the domain of your application — most probably, a silent login via Okta SSO will not work. You can fix that by putting GoodData.CN on the same domain as your application (GoodData.CN should be on a subdomain, for example, analytics.<your-domain>.com).
- Also, if your application is running in a different domain than Identity Server (in this article mentioned Okta), you can also have a problem with a silent login via Okta SSO. It is possible to fix that by using a custom URL domain.