

Single sign-on (SSO) is an important concept when it comes to working with GoodData.
The purpose of this article is to help you explore the different SSO scenarios that GoodData supports and to make them clear even for those who are not very familiar with the concept. After reading, you should have a good idea about what options you have available.
All the links to our documentation and relevant articles are included.
To wrap things up, I’ll take advantage of our new self-service SSO API and show you an example of how to set up service provider-initiated SSO with Auth0 from scratch.
Few keys things first:
-
The SSO implementation for your domain is fully self-service - no action is needed from GoodData if you want to get started. Everything can be configured by your own domain admin via our SSO provider API.
-
For our hosted platform, we support either SAML 2.0 or PGP-based authentication. We provide extensive documentation for both.
-
Documentation page to get you started: Single Sign-on Overview
Contents
Options for setting up SSO
For the hosted GoodData platform, you’ve got two options to choose from: PGP-based authentication and SAML 2.0.
PGP is based on the PGP keypair exchange. In certain scenarios, implementing PGP might be easier than getting started with SAML, but SAML does offer a more comprehensive package for central identity management once you set it up.
SAML is an acronym for Security Assertion Markup Language. It is an XML-based open-standard for transferring identity data between the identity provider (IdP) and a service provider (SP).
The difference between SPs and IdPs can be simplified to the following: Service providers are the different web applications that your users go to to accomplish the various tasks that comprise their work (like GoodData). The identity provider performs the actual authentication (usually with login credentials the user enters), which is then trusted by the service providers. Of the more known ones, we can name Auth0 and Okta.
Initial set-up
Once you’ve decided whether you want to go ahead with PGP or SAML, the process can be done from start to finish by your domain admin with the help of our documentation.
PGP: GoodData PGP Single Sign-On
SAML: SAML SSO with GoodData
With SAML, you can also take advantage of the Just-in-Time provisioning feature where you do not have to create and configure users - they are provisioned automatically for the selected workspace upon their first login to GoodData via the IdP. Comprehensive identity management using SCIM is also possible, allowing you to conduct your onboarding and offboarding in a centralized way within your IdP.
For a general example of how to set up SAML SSO, please refer to the practical example with Auth0 service provider-initiated scenario below. The fact that it’s service-provider initiated means that the users start on GoodData, are redirected to Auth0, authenticated, and then redirected back. If the scenario was identity provider-initiated, they would instead start in Auth0 and then continue on to GoodData.
Embedded iFrame and GoodData.UI SDK components
If you are not familiar with embedding GoodData elements in the form of an iFrame and the GoodData UI SDK, these two links will get you started:
Embedding iFrames: Embed GoodData Elements into Your Applications
GoodData.UI SDK: About GoodData.UI
In order for SSO with these options to be open to you, you first need to configure the SSO provider(s) as described in the previous section. Afterwards, you’re free to start.
The specifics of how to get SAML SSO working in a web application depend on the Identity Provider. The safest way to go is to consult the given IdP’s documentation - any common web application framework is nearly guaranteed to have an entry there you can consult.
For React-based applications using Auth0, we have a very good example which details the implementation of an iFrame step-by-step: Embed dashboard with a silent login via Auth0
Finally, for GoodData.UI, we have two examples which work through the whole process; one for PGP and one for SAML
PGP: GoodData.UI: PGP SSO Example
SAML: GoodData.UI: SAML SSO Example
Practical example with Auth0 through self-service API
Here is our entry point: You’ve got a fresh GoodData domain, you’re the domain admin, you’ve got an account with the Auth0 identity provider (IdP), and you’d like to set up a service provider-initiated SSO for this domain.
Quick note: This is a guide mostly aimed at beginners. If you are experienced with SSO and you know what you’re doing, our documentation will be a better choice for you.
Where to start? We need to set up the application in Auth0 first. I’ll be mostly following our documentation guide, but I'll make this example more visual.
Set-up on Auth0 side
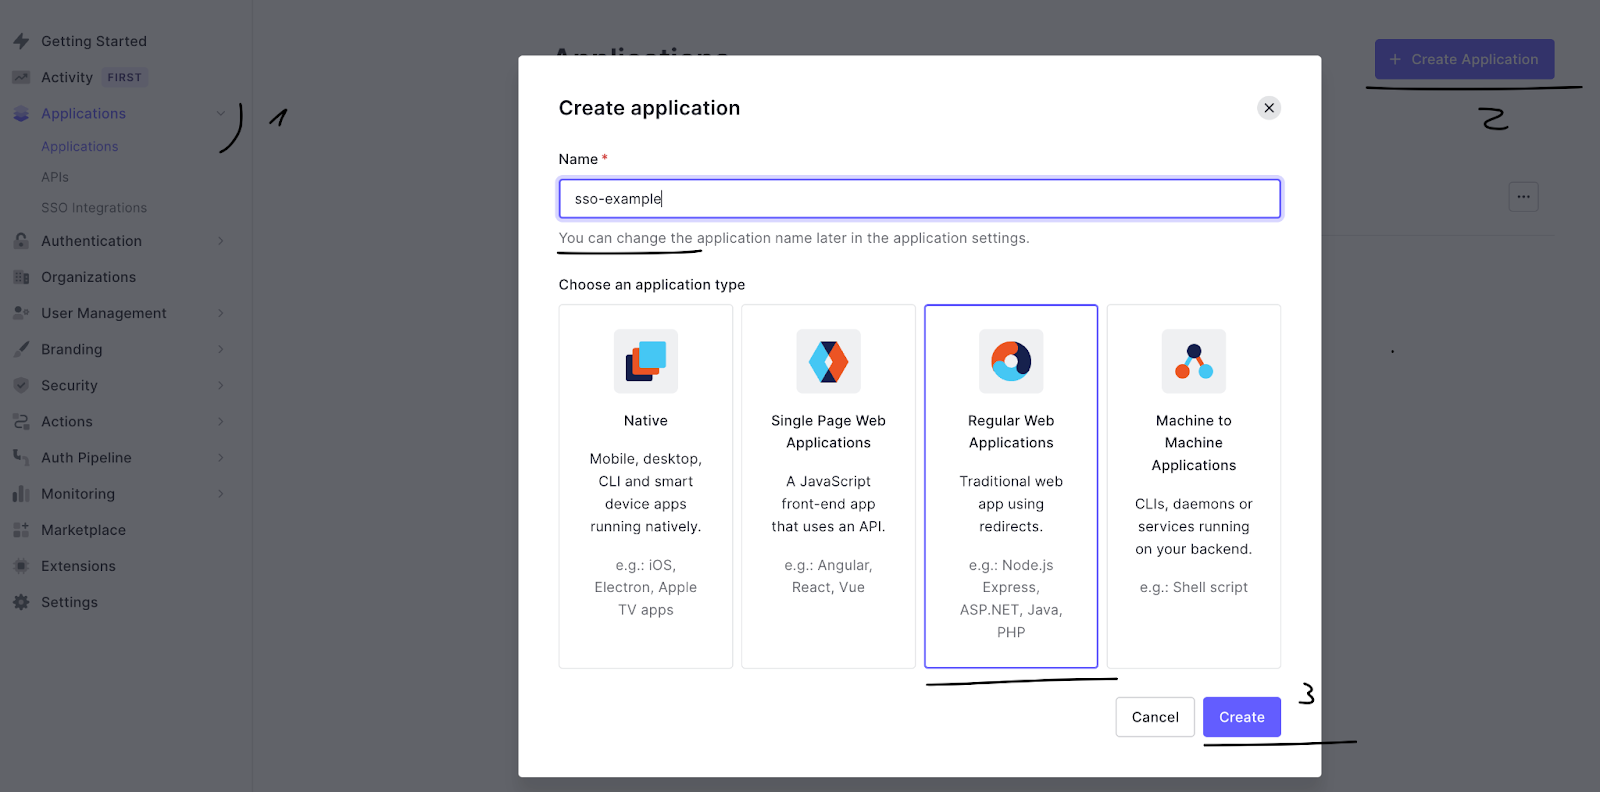
First, let’s create an application - for our purposes, a regular web application with a name of your choice will do.
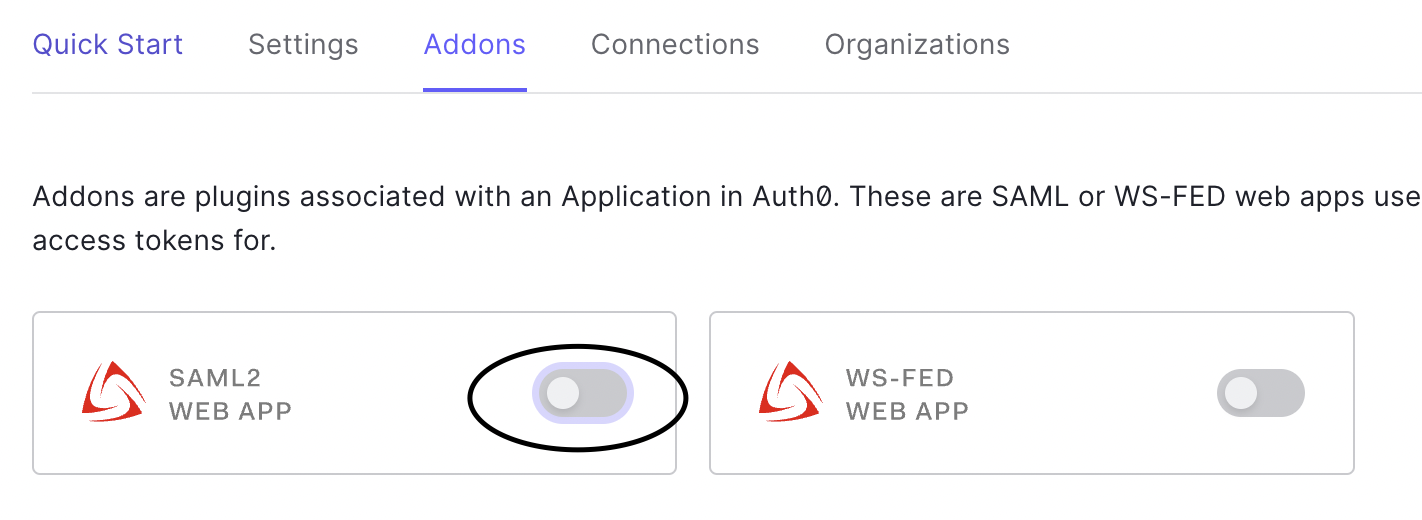
We can ignore whatever quick start stuff Auth0 suggests and move straight to the Addons tab and toggle SAML2 WEB APP.
You’ll get a pop-up. Now, switch over to the Settings tab. We have to fill in the Application Callback URL and Settings.
Important note here, since it is an area where mistakes happen: You are not Jan (me), so your callback URL and recipient cannot be jreh-internal. The callback must be the domain that you’re actually using - the link you have saved to access GoodData.

The callback url is according to the https://<your-domain>/gdc/account/samllogin template. For the template of the settings, you can use the one below, or get it straight from our documentation page. Be sure to replace the recipient with your own domain.
{

 "audience": "GoodData",

 "recipient": "https://jreh.internal.gooddata.com/gdc/account/samllogin",

 "mappings": {

   "email": "http://schemas.xmlsoap.org/ws/2005/05/identity/claims/emailaddress"

 },

 "signatureAlgorithm": "rsa-sha256",

 "nameIdentifierFormat": "urn:oasis:names:tc:SAML:1.1:nameid-format:emailAddress",

 "nameIdentifierProbes": [

   "http://schemas.xmlsoap.org/ws/2005/05/identity/claims/emailaddress"

 ],

 "binding": "urn:oasis:names:tc:SAML:2.0:bindings:HTTP-Redirect"

}
Once you’re done, you can use the Debug button to test it. If you get a smiley face saying “It works,” you’re good. You can scroll down to the bottom of the pop-up and click Enable.
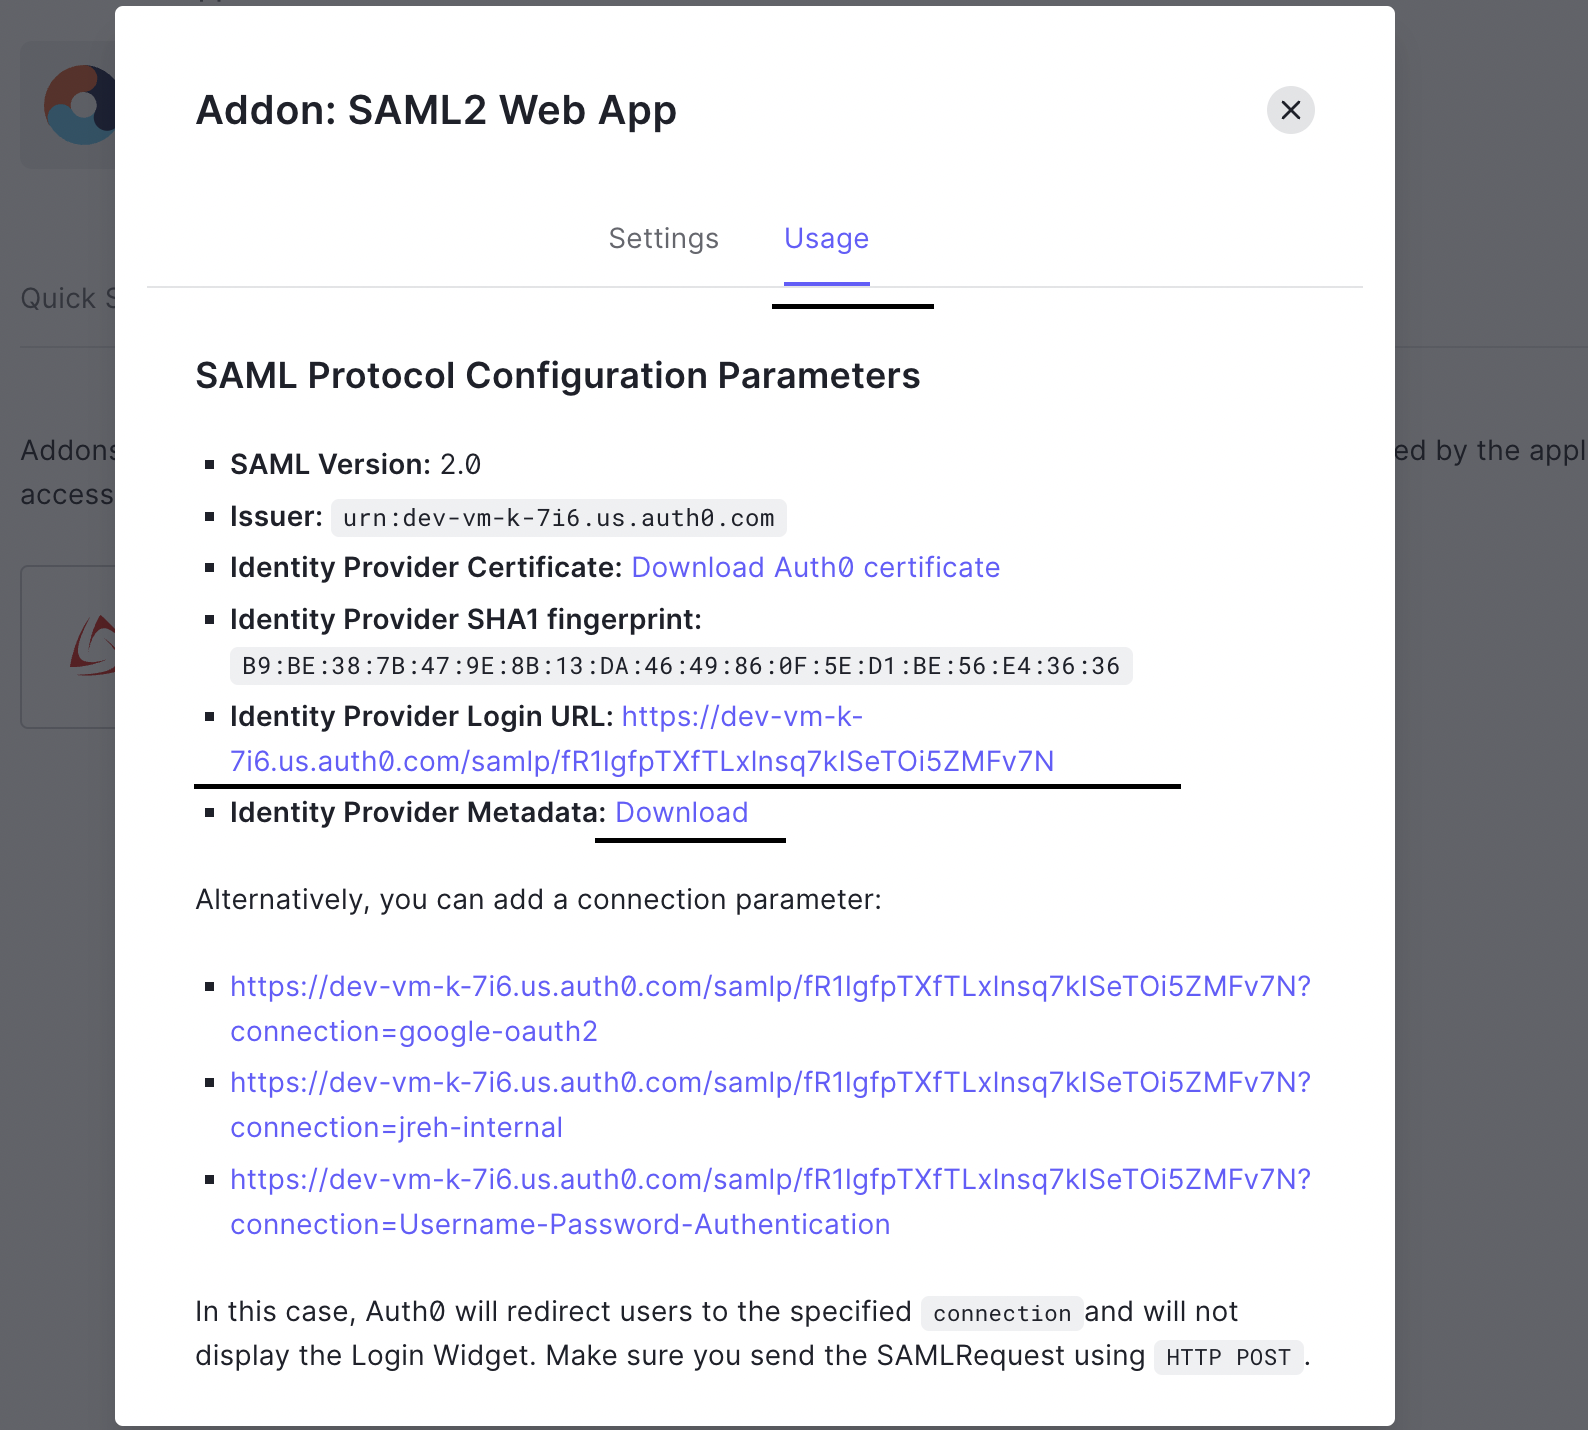
Afterwards, switch back to the Usage tab. Copy the Identity Provider Login URL for later use and download the Identity Provider Metadata file.
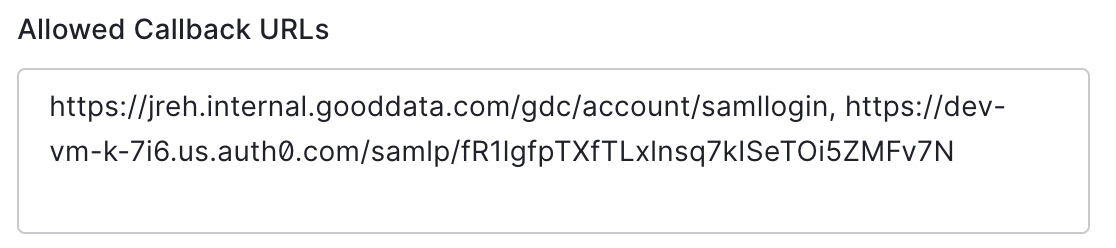
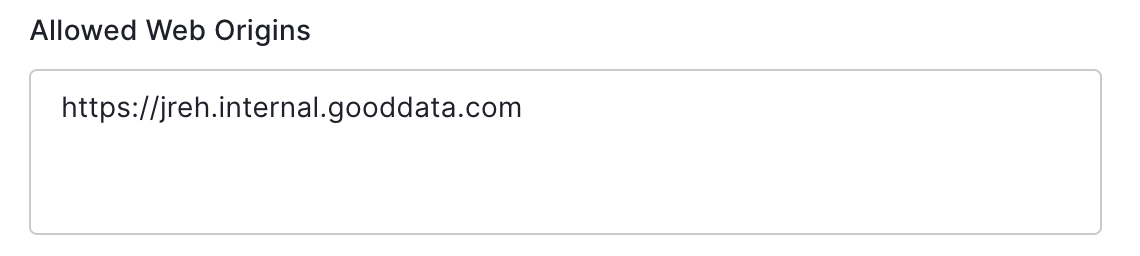
Close the pop-up and switch back to the Settings tab. Scroll down until you reach the Application URIs section. There’s two fields to fill in: Allowed Callback URLs and Allowed Web Origins.
Allowed Callback URLs should already have one link in it ending with /samllogin. Add a comma after it and paste the Identity Provider Login URL we saved in the earlier step above.
In the Allowed Web Origins, put the address of your domain. Again, it has to be the link you’re actually using, not the example you see below.
Save the changes. This concludes the Auth0 section. Next, we’ll work with GoodData API to configure the service provider-initiated login scenario.
Set-up on GoodData API side
Again, I’ll be following our documentation closely, but with more visual examples to help users who have less experience with this area.
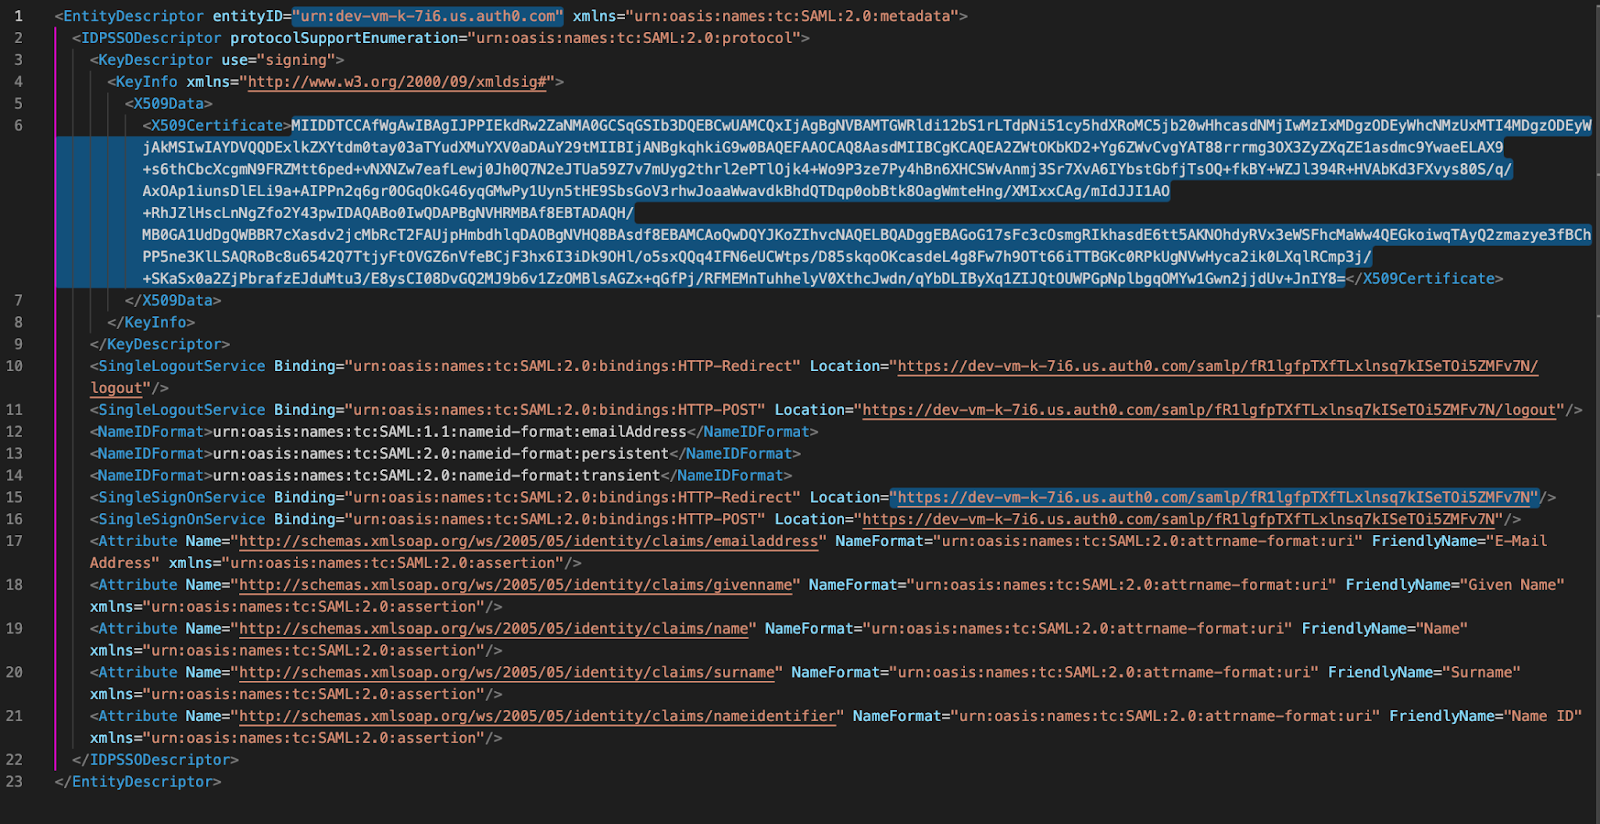
As the documentation says, we need a metadata file. Fortunately, we downloaded the one from Auth0 in an earlier step. This file will be our source for building an API call that will create the SSO provider. Figuring out which parts of the XML file are important can be a bit tricky. I’ve highlighted the relevant sections below on lines number 1, 6, and 15.
This is the current template for the API call we’ll be making. For Auth0, the "skipMessageSignatureCheck" value needs to be set to true. Note the \n characters escaping the new lines for the API call. You’ll want to put the certificate between those.
{

 "samlProvider": {

   "name": "Up to you",

   "publicKey": "-----BEGIN CERTIFICATE-----\nFrom line 6\n-----END CERTIFICATE-----",

   "issuer": "From line 1",

   "loginUrl": "From line 15",

   "skipAssertionSignatureCheck": false,

   "skipMessageSignatureCheck": true,

   "serviceProviderInitiatedUrl": "From line 15"

 }

}
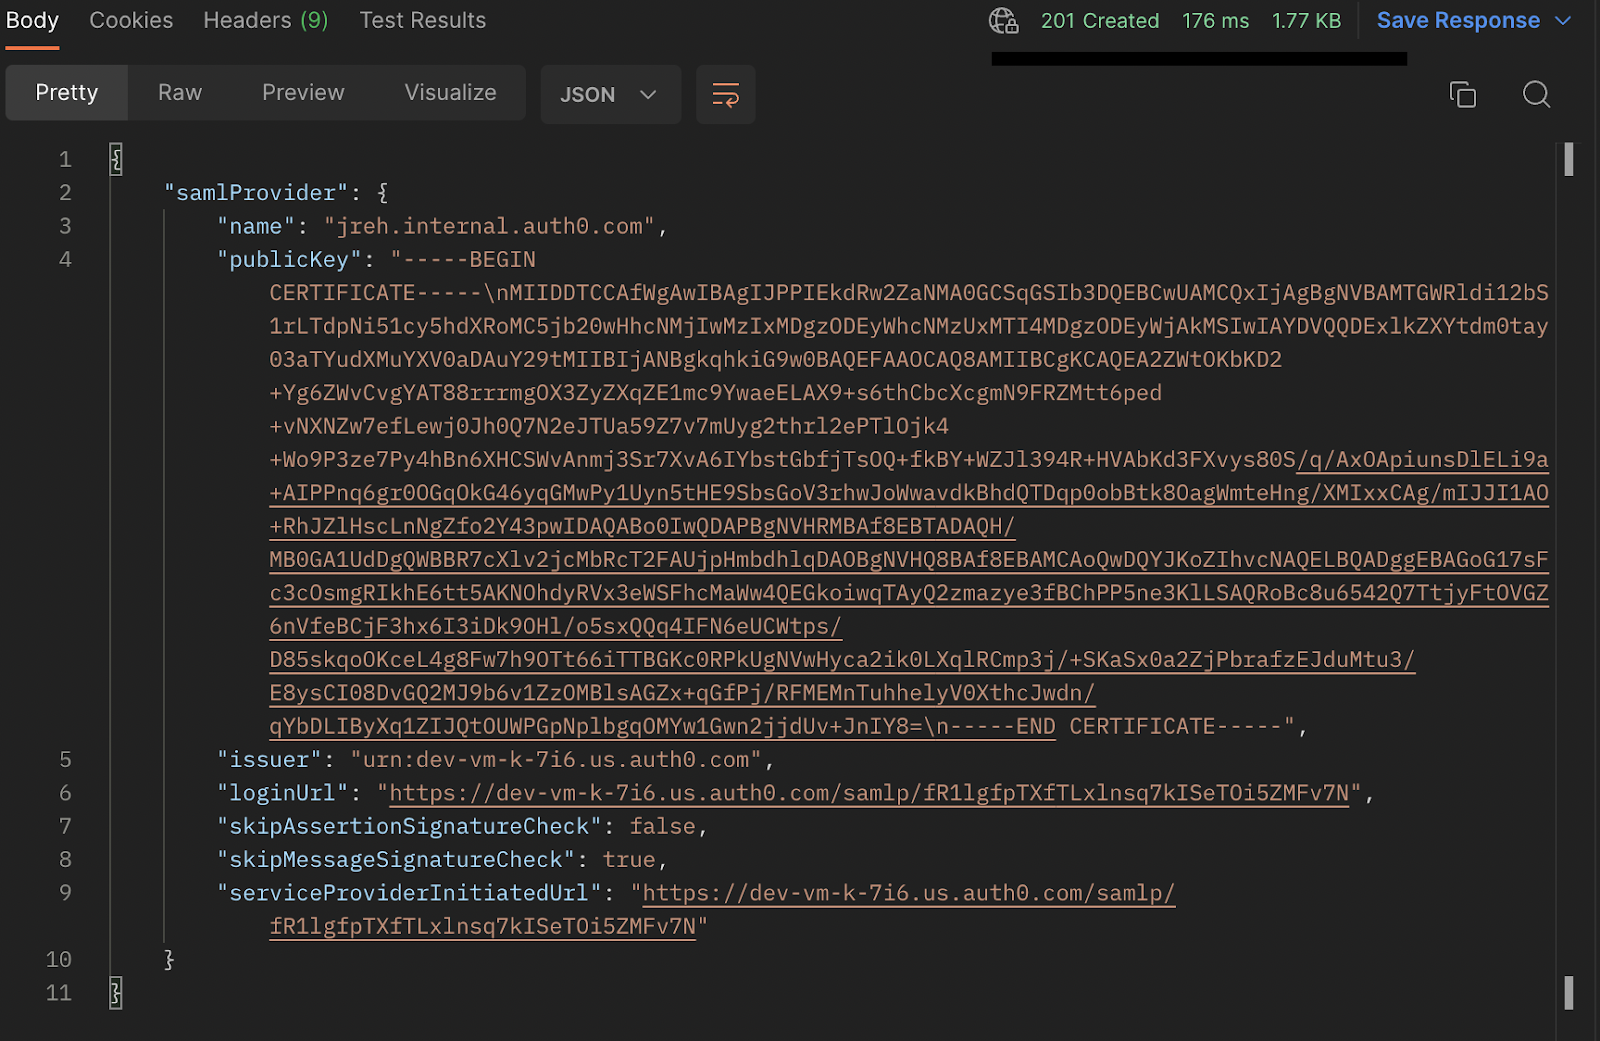
Note that the name can contain only letters, numbers, dots, underscores and dashes. For my own ease of use, I chose "jreh.internal.auth0.com".. The name is up to your own preference - it is for you, your system, and your readability. When filled in from the relevant lines, the template becomes this:
{

 "samlProvider": {

   "name": "jreh.internal.auth0.com",

   "publicKey": "-----BEGIN CERTIFICATE-----\nMIIDDTCCAfWgAwIBAgIJPPIEkdRw2ZaNMA0GCSqGSIb3DQEBCwUAMCQxIjAgBgNVBAMTGWRldi12bS1rLTdpNi51cy5hdXRoMC5jb20wHhcNMjIwMzIxMDgzODEyWhcNMzUxMTI4MDgzODEyWjAkMSIwIAYDVQQDExlkZXYtdm0tay03aTYudXMuYXV0aDAuY29tMIIBIjANBgkqhkiG9w0BAQEFAAOCAQ8AMIIBCgKCAQEA2ZWtOKbKD2+Yg6ZWvCvgYsef23AT88rrrmgOX3ZyZXqZE1mc9YwaeELAX9+s6thCbcXcgmN9FRZMtt6pe23d+vNXNZw7efLewj0Jh0Q7N2eJTUa59Z7v7mUyg2thrl2ePTlOjk4+Wo9P3ze7Py4hBn6XHC123SWvAnmj3Sr7XvA6IYbstGb123fjTsOQ+fkBY+WZJl394R+HVAbKd3FXvysefs80S/q/AxOApiunsDlELi9a+AIPPnq6gr0OGqOkG46yqGMwPy1Uyn5tHE9SbsGoV3rhwJoWwavdkBhdQTDqp0obBtk8O324agWmteHng/XMIxxCAg/mIJJI1AO+RhJZlHscLnNgZfo2Y43pwIDAQABo0IwQDAPBgNVHRMBAf8EBTADAQH/MB0GA1UdDgQWBBR7cXlv2jcMbRcT2FAUjpHmbdhlqDAOBgNVHQ8BAf8EBAMCAoQwDQYJKoZIhvcNAQELBQADggEBAGoG2sf17sFc3cOsmgRIkhE6tt5AKNOhdyRVx3eWSFhcMaWw4QEGkoiwqTAyQ2zmazye3fBChPP5ne3KlLSAQRoBc8u6542Q7TtjyFtOVGZ6nVfeBCjF3hx6I3iDk9OHl/o5sxQQq4IFN6eUCWtps/D85skqoOKceL4g8Fw7h9OTt66iTTBGKc0RPkUgNVwHyca2ik0LXqlRCmp3j/+SKaSx0a2ZjPbrafzEJduMtu3/E8ysCI08DvGQ2MJ9b6v1ZzOMBlsAGZx+qGfPj/RFMEMnTuhhelyV0XthcJwdn/qYbDLIByXq1ZIJQtOUWPGpNplbgqOMYw1Gwn2jjdUv+JnIY8=\n-----END CERTIFICATE-----",

   "issuer": "urn:dev-vm-k-7i6.us.auth0.com",

   "loginUrl": "https://dev-vm-k-7i6.us.auth0.com/samlp/fR1lgfpTXfTLxlnsq7kISeTOi5ZMFv7N",

   "skipAssertionSignatureCheck": false,

   "skipMessageSignatureCheck": true,

   "serviceProviderInitiatedUrl": "https://dev-vm-k-7i6.us.auth0.com/samlp/fR1lgfpTXfTLxlnsq7kISeTOi5ZMFv7N"

 }

}
I’ll be sending this JSON as the body of a POST request to:
https://jreh.internal.gooddata.com/gdc/domains/jreh-internal/authentication/providers
To send API calls of this sort, my preference is to use the Postman application, but the amount of options of how to do this is vast and up to you.
After you send the POST request, you should receive a 201 HTTP response like this:
That means all is well and you have successfully created the SSO provider. If you receive something else, take a look at your JSON structure - it is likely it’s going to be some sort of syntactical error which one of the many publicly available JSON formatters could help you find.
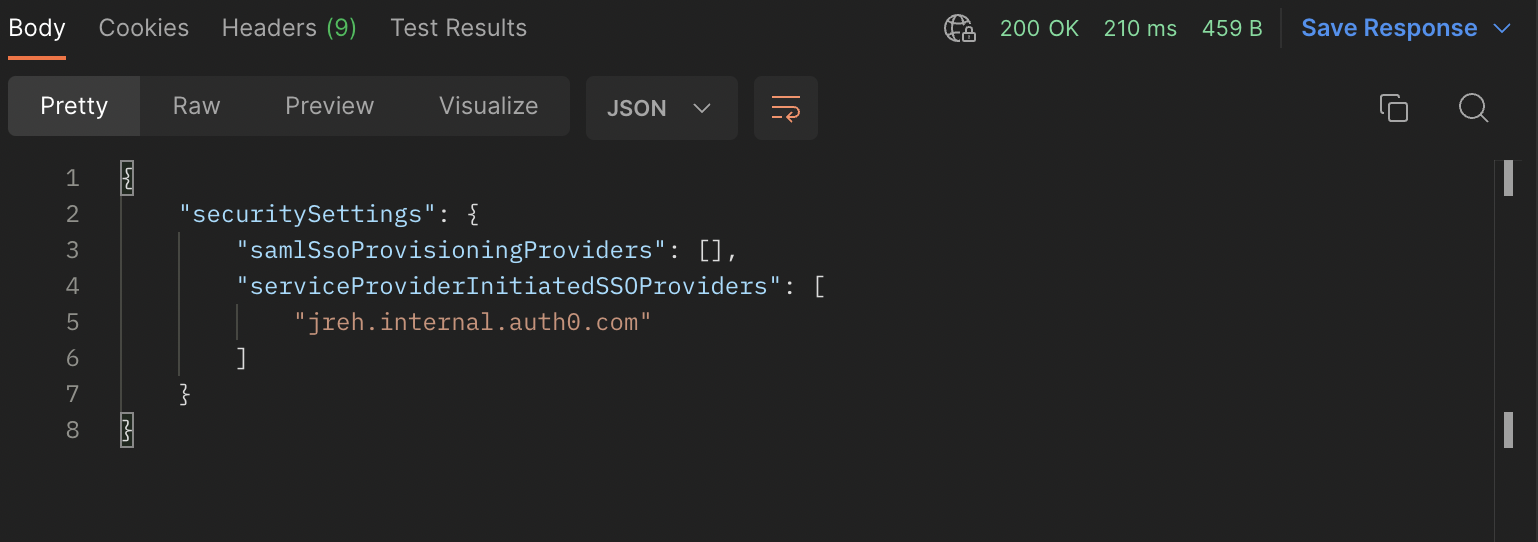
The last thing we need to configure for the service provider-initiated SSO are the security settings of your domain. The JSON structure is very simple.
{

   "securitySettings": {

       "samlSsoProvisioningProviders": [],

       "serviceProviderInitiatedSSOProviders": [

           "jreh.internal.auth0.com"

       ]

   }

}
"samlSsoProvisioningProviders" key can be used to create Just-in-Time provisioning, but that's not part of our example here, so we'll leave it empty. "serviceProviderInitiatedSSOProviders" is what we want, and the value to input into the array is the "name" of our SSO provider from the earlier step.
Once prepared, I’ll be sending this request as PUT to:
https://jreh.internal.gooddata.com/gdc/domains/jreh-internal/securitySettings If all is well, you will receive a 200 OK status code and the SSO provider with the service provider-initiated scenario is ready to be used. Please note that when it comes to the securitySettings, the cache on our side can play a role. If you update them and you don’t see a change, try waiting 10-20 minutes.
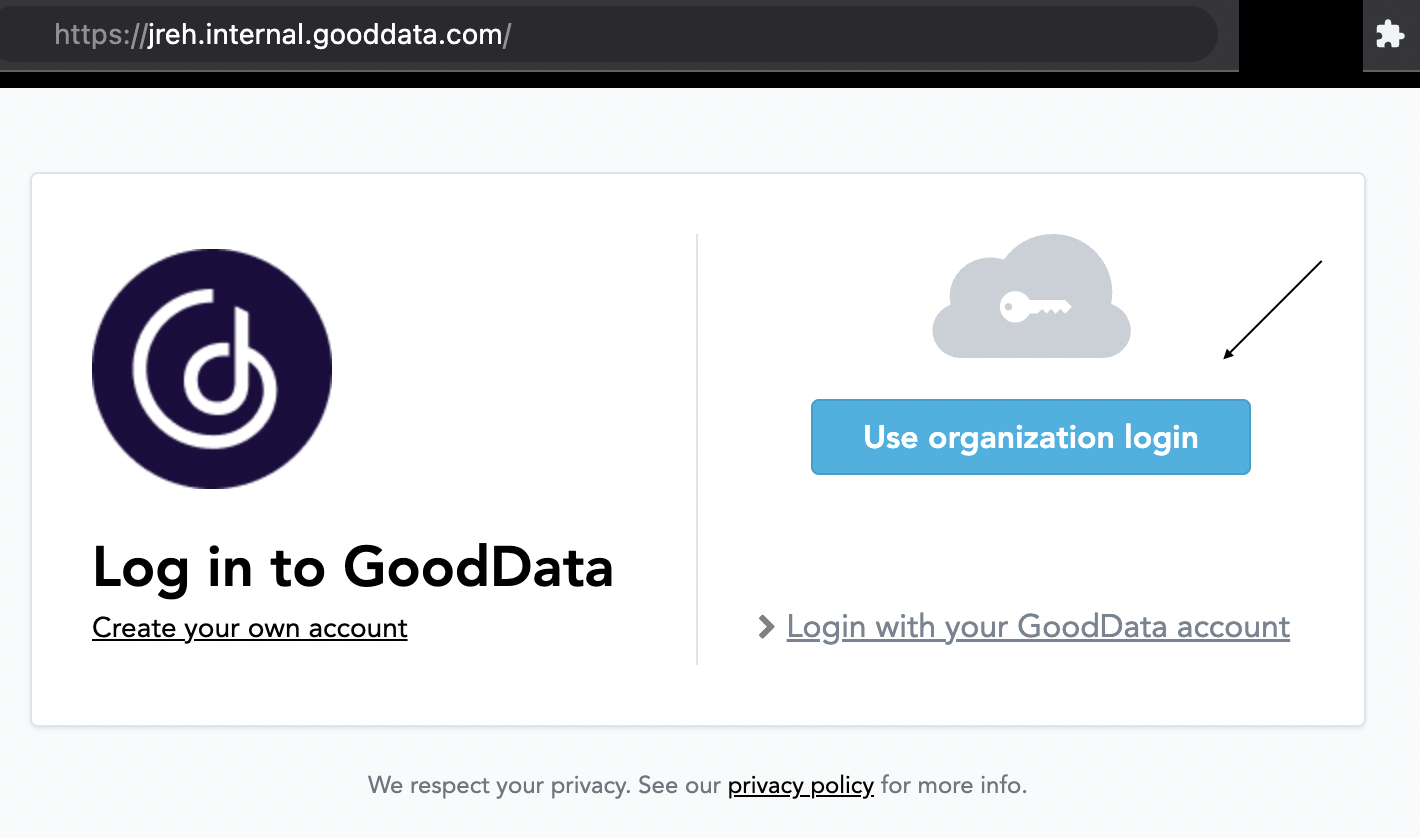
You should be able to see a login button when accessing your domain. Once you click it, it should redirect you to Auth0 for authentication, and then redirect you to your GoodData workspace.
Assuming it worked, you’re all done with the SSO setup for your domain. What remains is to configure the users’ settings.
Configuring the users’ authentication modes
Much like workspaces, each user has his unique ID. To retrieve all the users in my domain, I’ll send a GET request to https://jreh.internal.gooddata.com/gdc/domains/jreh-internal/users
The reply (in a shortened version to make it easier to read here) is:
{

   "accountSettings": {

       "paging": {

           "offset": 0,

           "count": 6

       },

       "items": [

           {

               "accountSetting": {

                   "ssoProvider": "jreh.internal.auth0.com",

                   "placeholder for community": "...",

                   "firstName": "Jan1",

                   "lastName": "Rehanek1",

                   "authenticationModes": [

                       "PASSWORD",

                       "SSO"

                   ],

                   "links": {

                       "self": "/gdc/account/profile/c8ec863a97d91233c2b6e072d8486d3ca",

                       "placeholder for community": "..."

                   }

               }

           },

           {

               "accountSetting": {

                   "ssoProvider": null,

                   "placeholder for community": "...",

                   "firstName": "Jan2",

                   "lastName": "Rehanek2",

                   "authenticationModes": [],

                   "links": {

                       "self": "/gdc/account/profile/a312d87ff81a2975306688000cfb915a",

                       "placeholder for community": "..."

                   }

               }

           }

       ]

   }

}
We are looking at three things:
-
"authenticationModes": [ "PASSWORD", "SSO" ] for the first user shows us that they already have SSO configured, but the empty array in "authenticationModes” : [ ] for the second user shows that they need it configured.
-
"ssoProvider": "jreh.internal.auth0.com" for the 1st user and "ssoProvider": null for the 2nd user shows us the same.
-
"self": "/gdc/account/profile/a312d87ff81a2975306688000cfb915a" shows us the user ID of the second user, marked in purple. We’ll also need the “firstName” and “lastName” values in the following step.
Let’s modify that user so they can also benefit from SSO.
A PUT request to https://jreh.internal.gooddata.com/gdc/account/profile/a312d87ff81a2975306688000cfb915a with the following body will do the trick:
{

   "accountSetting": {

       "ssoProvider": "jreh.internal.auth0.com",

       "lastName": "Jan2",

       "firstName": "Rehanek2",

       "authenticationModes": [

           "PASSWORD",

           "SSO"

       ]

   }

}
“lastName” and “firstName” are mandatory to include. The expected response is a 200 OK code with the following body:
{

   "accountSetting": {

       "ssoProvider": "jreh.internal.auth0.com",

       "placeholder for community": "...",

       "lastName": "Jan2",

       "firstName": "Rehanek2",

       "authenticationModes": [

           "PASSWORD",

           "SSO"

       ],

       "links": {

           "self": "/gdc/account/profile/a312d87ff81a2975306688000cfb915a",

           "placeholder for community": "..."

       }

   }

}
That user is now SSO-enabled. For multiple users, I would recommend handling it programmatically: To retrieve all user IDs, iterate over them, filter those who are missing, and to generate PUT requests for them. Python, Ruby, or any other programming language capable of working with an API allows for this.
It is also possible for our support team to enable this for the entire domain. This, at the moment, cannot be done by users.
---
That’s it. I hope the basics of SSO are a little more clear now.
All done!